Curriculum Hub → Maths Lessons → Algebra → Graphical functions → Plotting Quadratic Graphs
Ready-to-teach lesson. Includes PowerPoint, printable worksheet and fully worked solutions. Saves 2+ hours of planning.
Teach plotting quadratic graphs with this ready-to-teach GCSE Grade 5 maths lesson. Students build a physical sense of a parabola, complete tables of values, plot smooth curves on Cartesian axes, and use the shape of the graph to self-check for errors. The lesson includes editable slides, a printable worksheet, a video tutorial, and exam-style practice with worked solutions.
Students who understand the properties of a parabola are far more likely to spot and correct their own mistakes. This lesson slows down at the start so that understanding is in place before anyone picks up a pencil to plot a point. It also prepares students for the next step: solving quadratic equations graphically.
Three for Key Stage 3, one for GCSE and two for A-Level. Presentation, worksheet and answers for each, plus one free resource every Monday.
Unsubscribe any time.
Watch this tutorial first to see how to complete a table of values and plot a smooth parabola on Cartesian axes. Download the handout to work along with the video, then try the free worksheet below.
Key topics: tables of values, plotting coordinates, drawing a smooth parabola, and using the shape of the curve to check for mistakes.
Download the free GCSE worksheet. It includes exam-style plotting questions, space for working, and fully worked solutions in the accordions below.
Free download: no membership required

Members get complete plotting lessons for KS3 and GCSE: editable slides, differentiated worksheets and teaching examples, plus 1000+ more KS3 and GCSE resources.
This section walks through the full lesson, from a physical starter that builds the shape of a parabola to completing tables, plotting smooth curves, and using the graph itself as an error-check.
Below you will find the differentiated learning objectives, a step-by-step teaching approach, common student errors with classroom images, and tips for support and extension. For simpler functions, use the KS3 Drawing Parabolas pack. For more demanding equations and solving graphically, use the GCSE Plotting Quadratic Functions pack.
Before any tables or plotting, give students a physical picture of the shape.
Stand at one end of the classroom and ask a volunteer to stand at the other. Throw a whiteboard pen towards them and ask the class to sketch the path of the pen on their mini-whiteboards.

Discuss what is happening:
This gives students a strong, physical sense of a smooth, symmetrical curve with a single turning point, which they can refer back to for the rest of the lesson. GeoGebra and Desmos are a useful supplement here too for independent exploration and teacher demonstrations.
Students complete a table of x and y values before plotting anything.

Best for: building accuracy before any plotting starts.
Best for: turning a correct table into a correct graph.
Tip: add an extra row to the table for each calculation step, so students can see and check their working. Some students can fill in the table perfectly but then do not know how to use it to plot coordinates. Build in explicit practice turning table values into coordinate pairs before moving on.
To keep the pace early on, give students a pair of ready-scaled axes. As their confidence grows, let them draw their own grid on A4 graph paper and choose a sensible scale themselves.
When it comes to drawing the curve, a few tips help a lot:
Look out for these issues as students work:
The parabola does not have a clear maximum or minimum turning point.

A coordinate is calculated or plotted incorrectly.

Students join points with straight line segments, suggesting the relationship is linear.

The curve misses some points or is not drawn smoothly.

Once students finish their first graph, ask them to hold it up.
Have a quick class discussion about whether each graph matches the properties of a parabola discussed in the starter. If it does not, students can use the shape itself to spot errors in their table or plotting, then go back and correct them.
This turns the parabola into a built-in error-check, rather than something students only find out about when the work is marked.
In the following lesson, use the parabola to solve quadratic equations by exploring how many solutions exist depending on where a straight line intersects the curve: two points, one point, or none at all.
This is also a good place to discuss how the gradient and intercept of the straight line change the number of solutions.


Students who need more support
More able students
Allow five to ten minutes for students to hold up their graphs and compare them with the starter properties: one turning point, smooth curve, and symmetry where expected. Students who spot a mismatch correct the table or plotting before you collect the work.
| Phase | Focus | Time |
|---|---|---|
| Starter | Physical demo, discover the shape of a parabola | 5 to 10 min |
| Development | Complete table of values, spot the squaring mistake | 10 to 15 min |
| Main | Plot the graph, draw a smooth curve | 15 to 20 min |
| Common mistakes | Compare graphs against the four issues | 5 to 10 min |
| Plenary | Self-check using parabola properties | 5 to 10 min |
Use this checklist after the lesson or as a revision self-check. Each skill is covered on this page or linked to the next lesson in the sequence.
Try these 4 GCSE-style questions, then reveal the solutions to check your working. You can also download the exam questions PDF.
How to use these questions in class
Q1: Table, plot and estimate roots
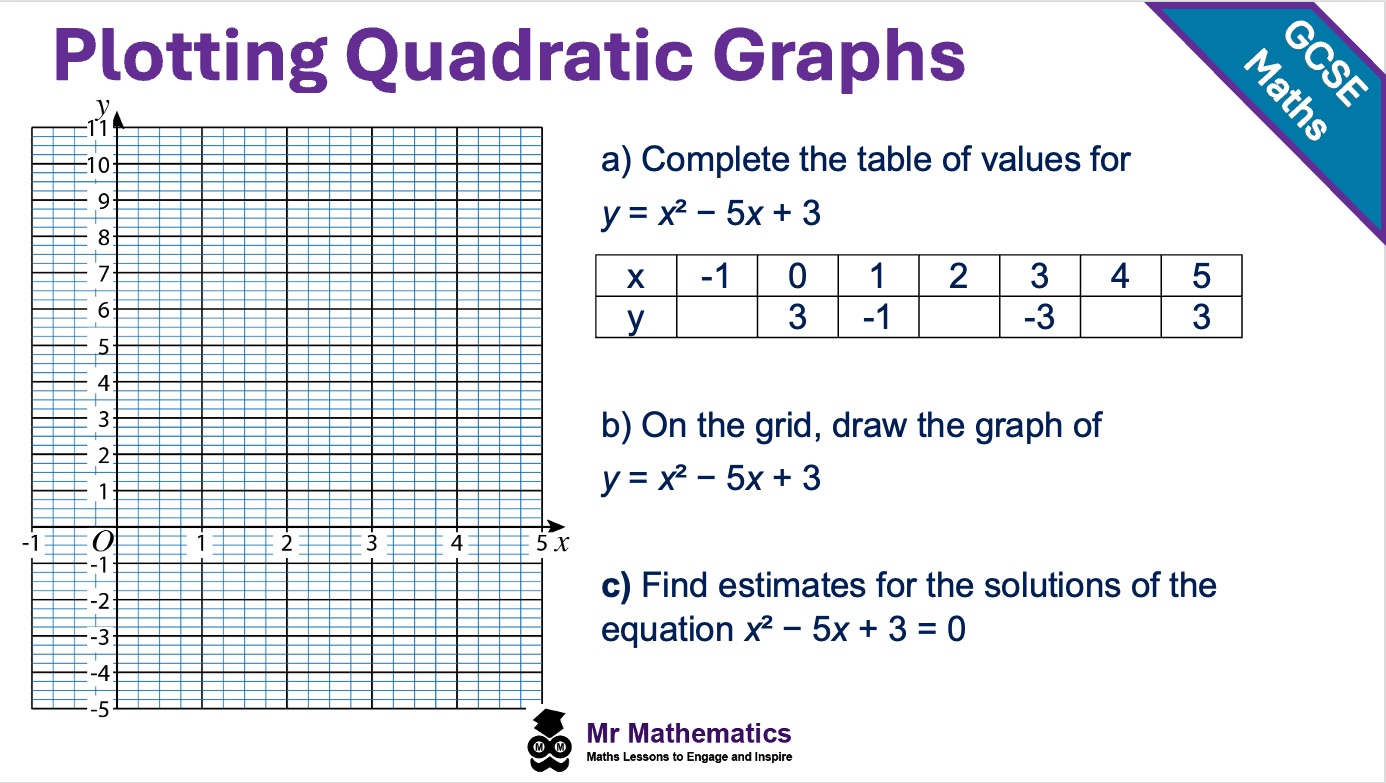
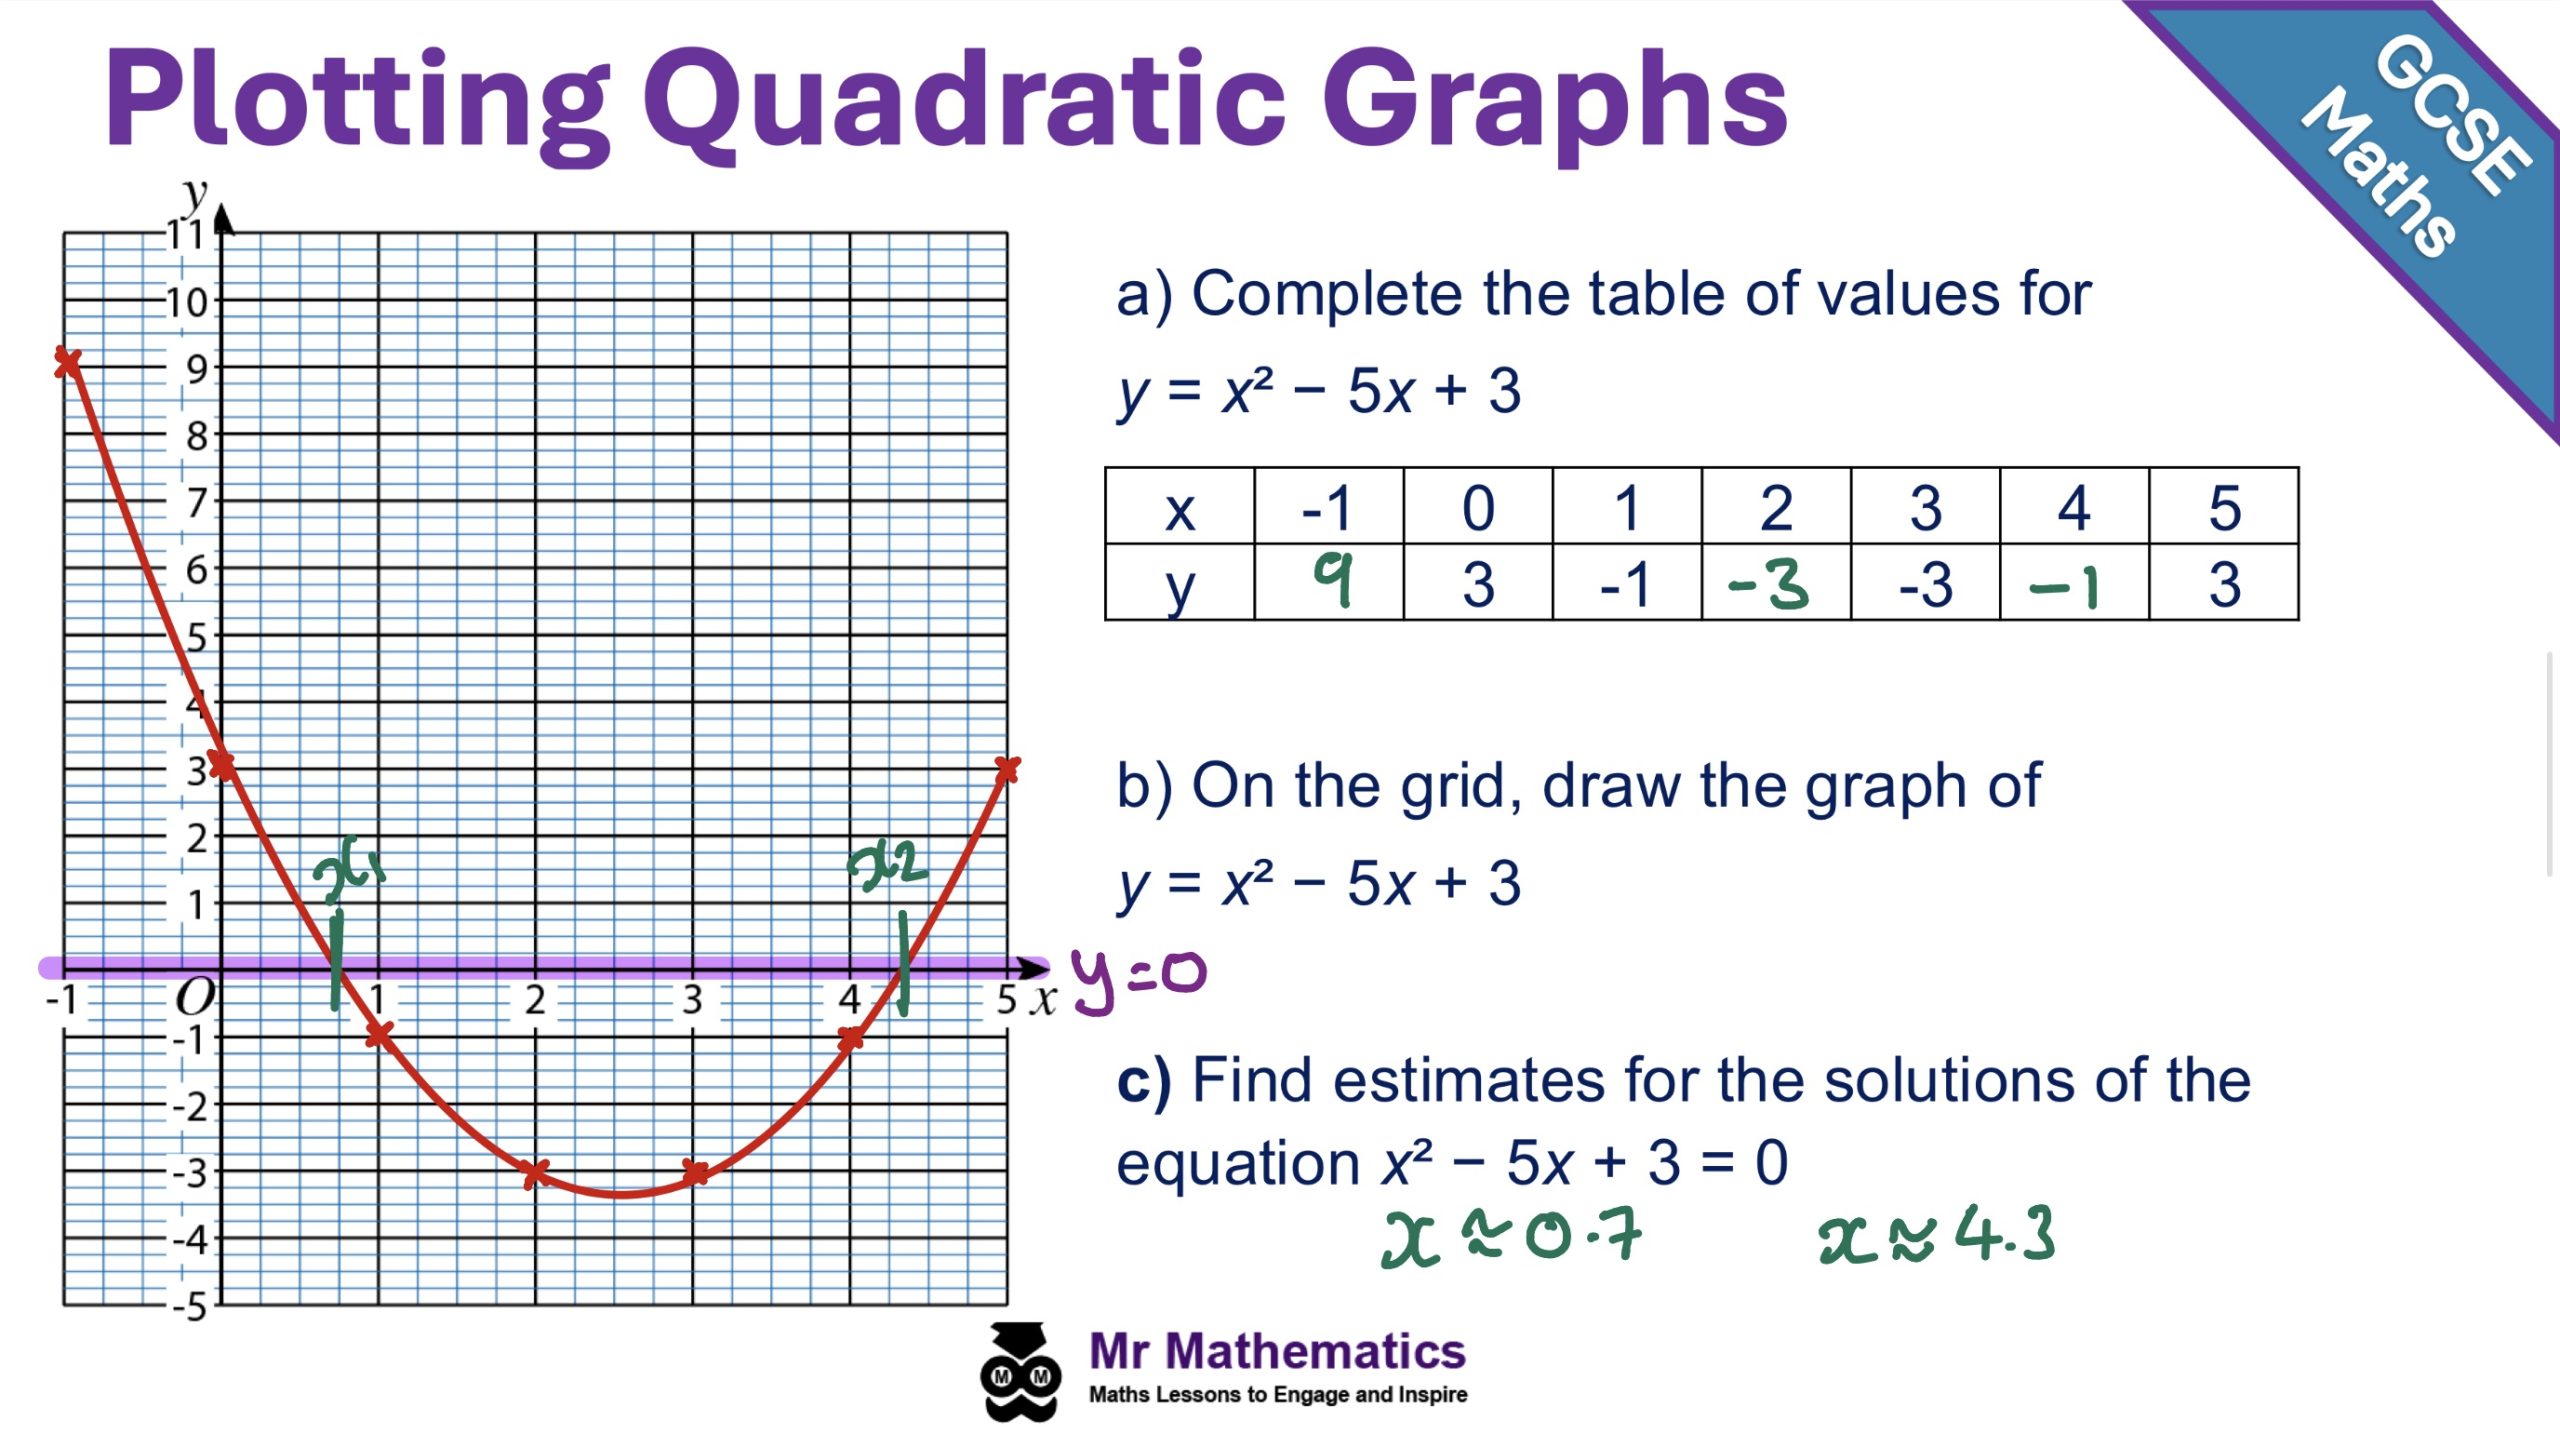
Q2: Plot and find roots
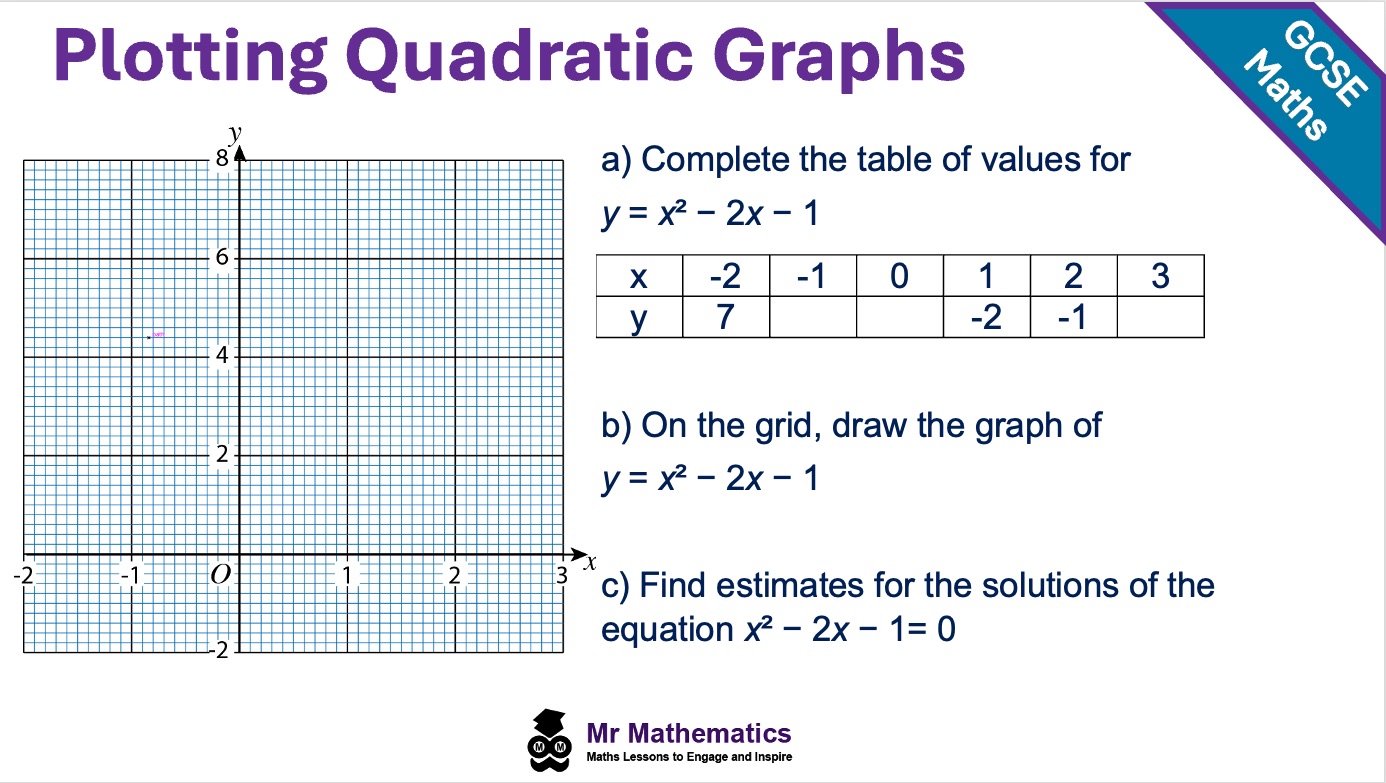
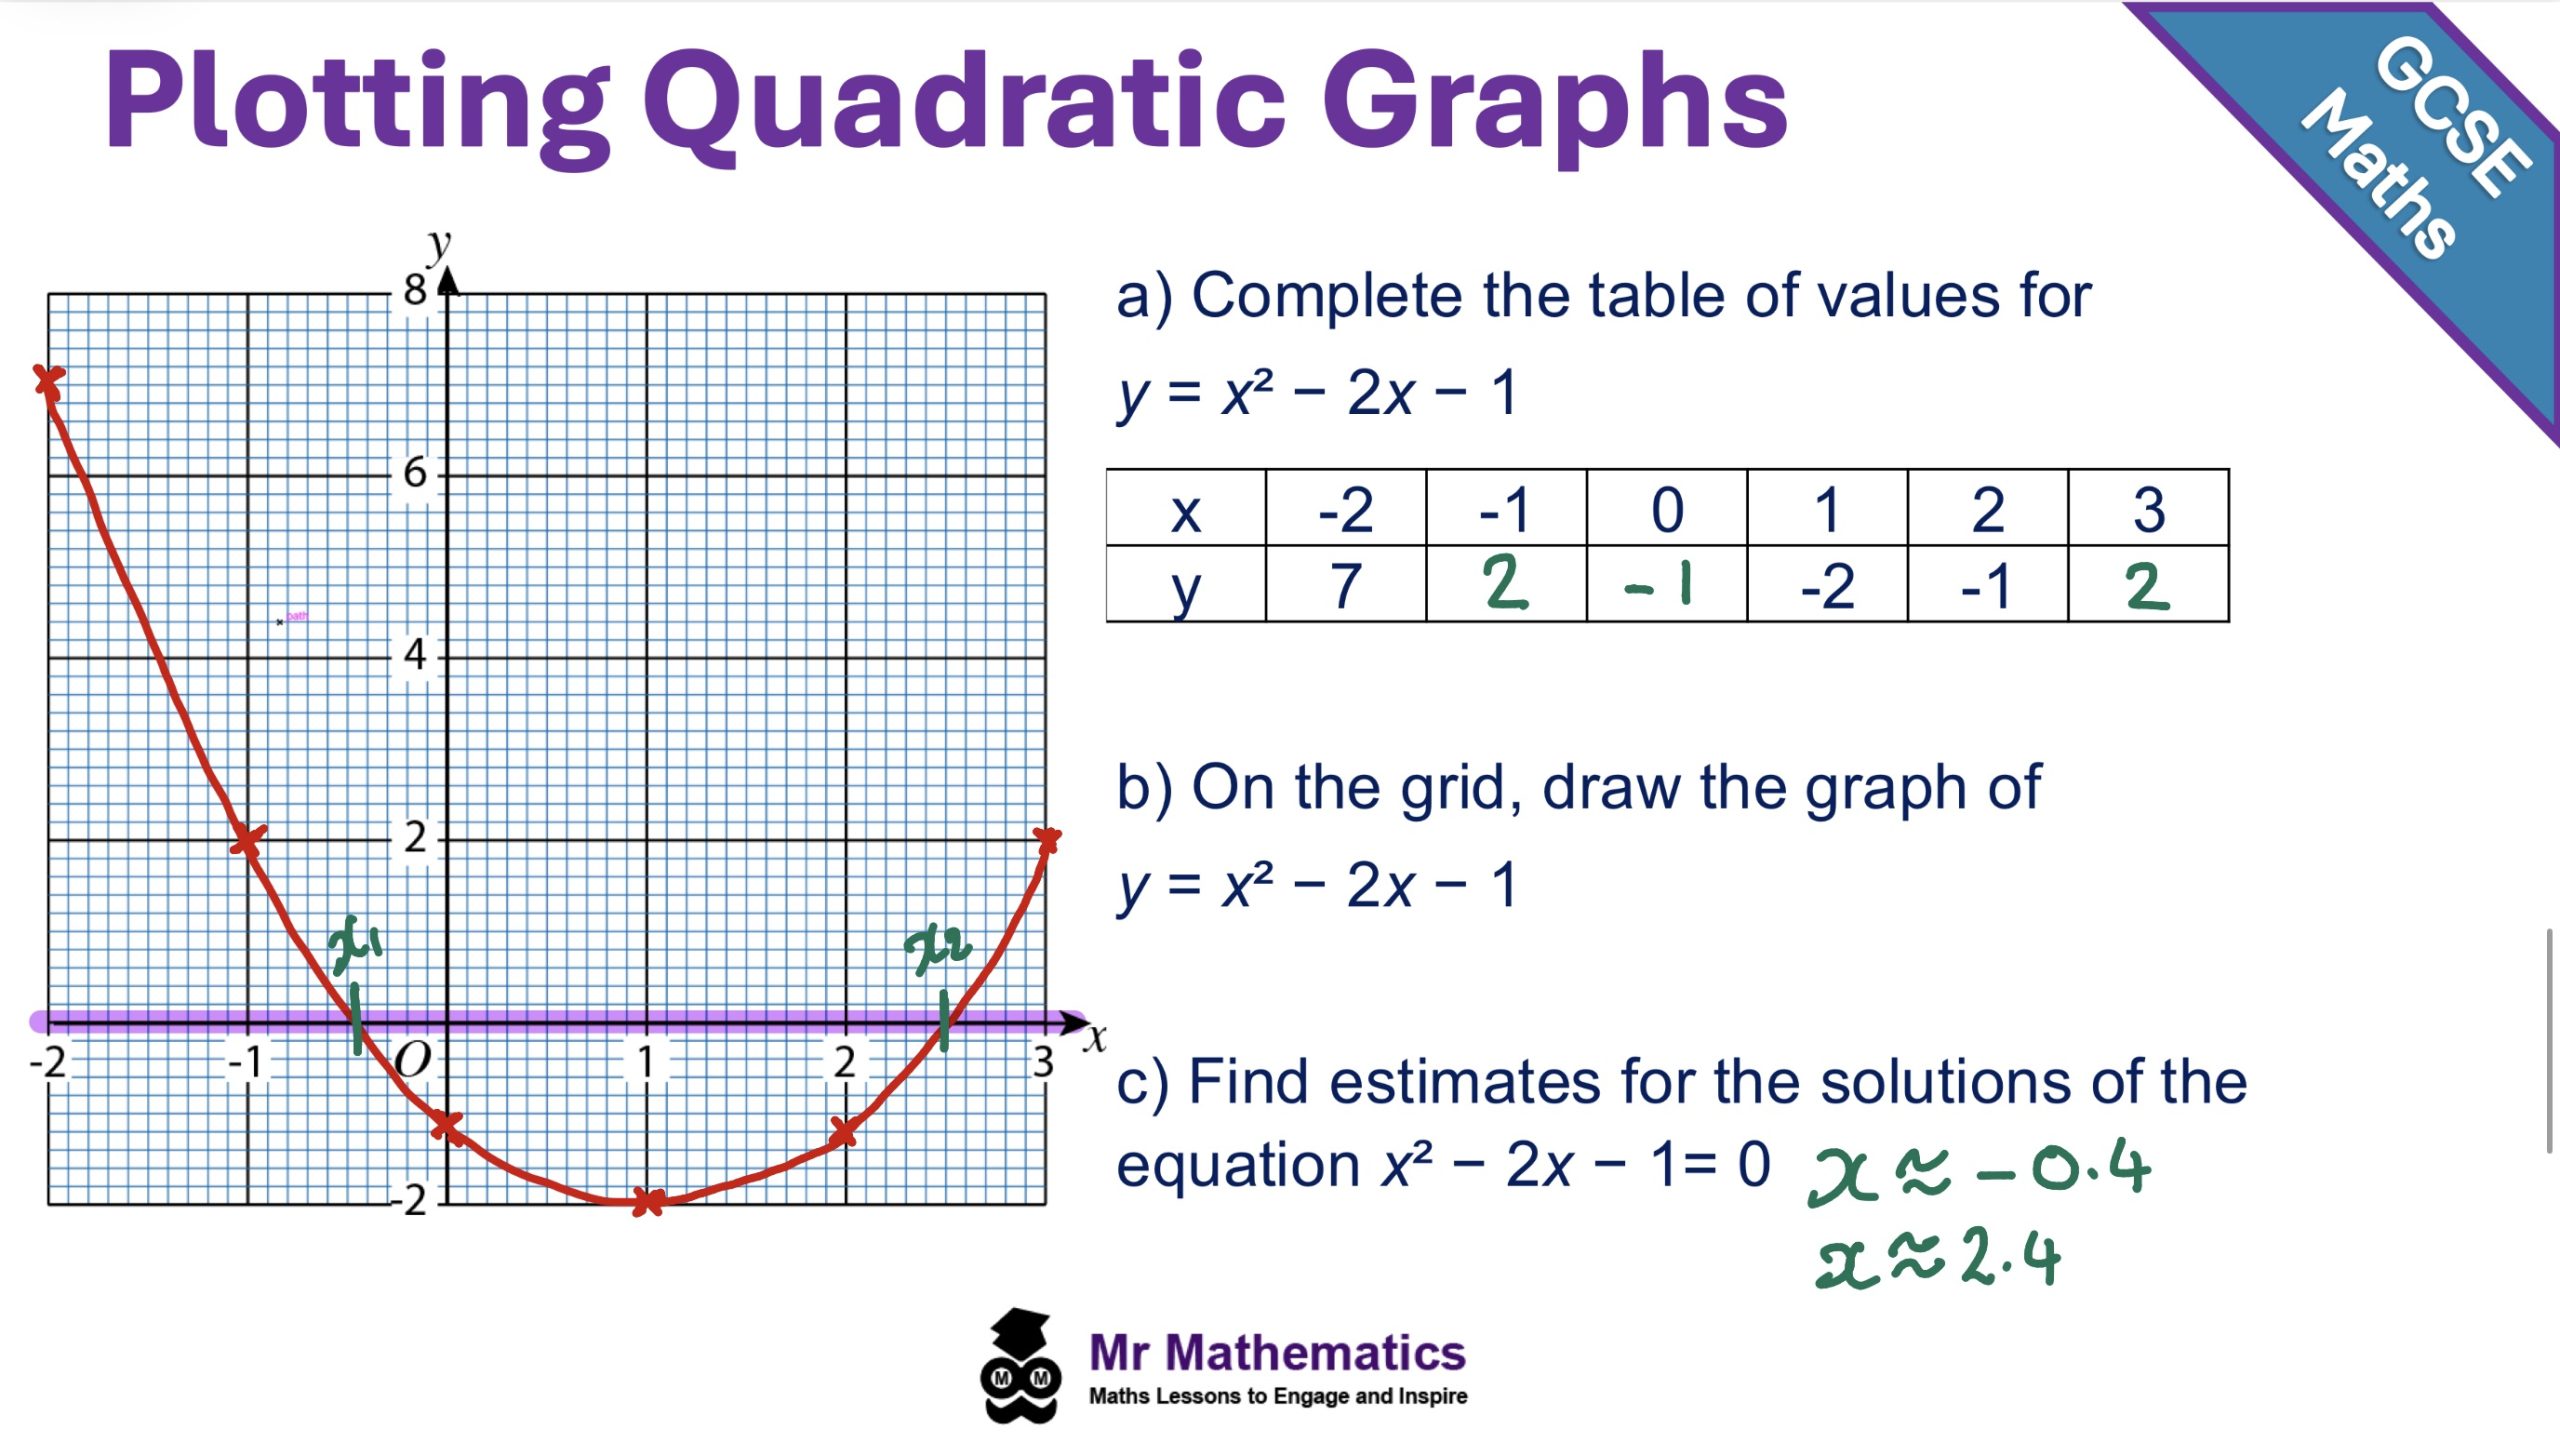
Q3: Inverted quadratic and horizontal line
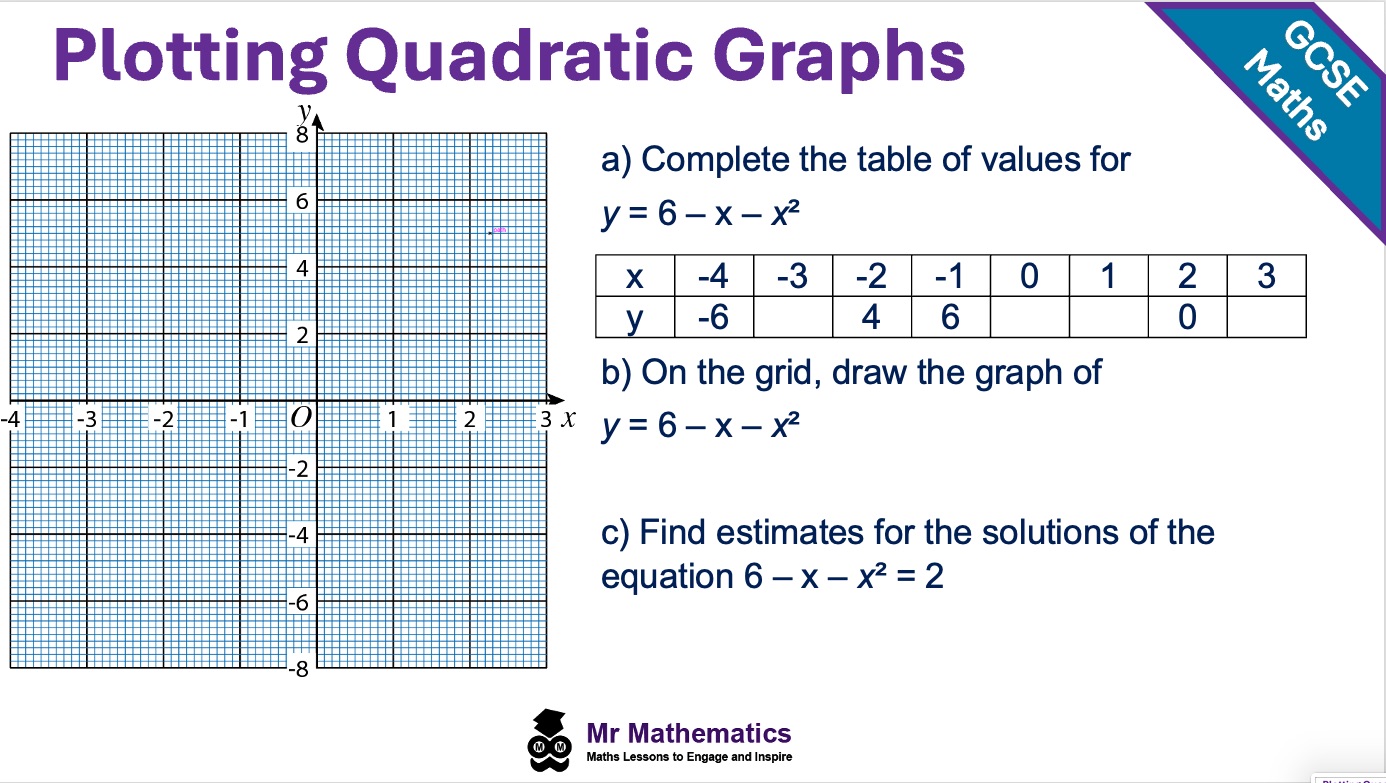
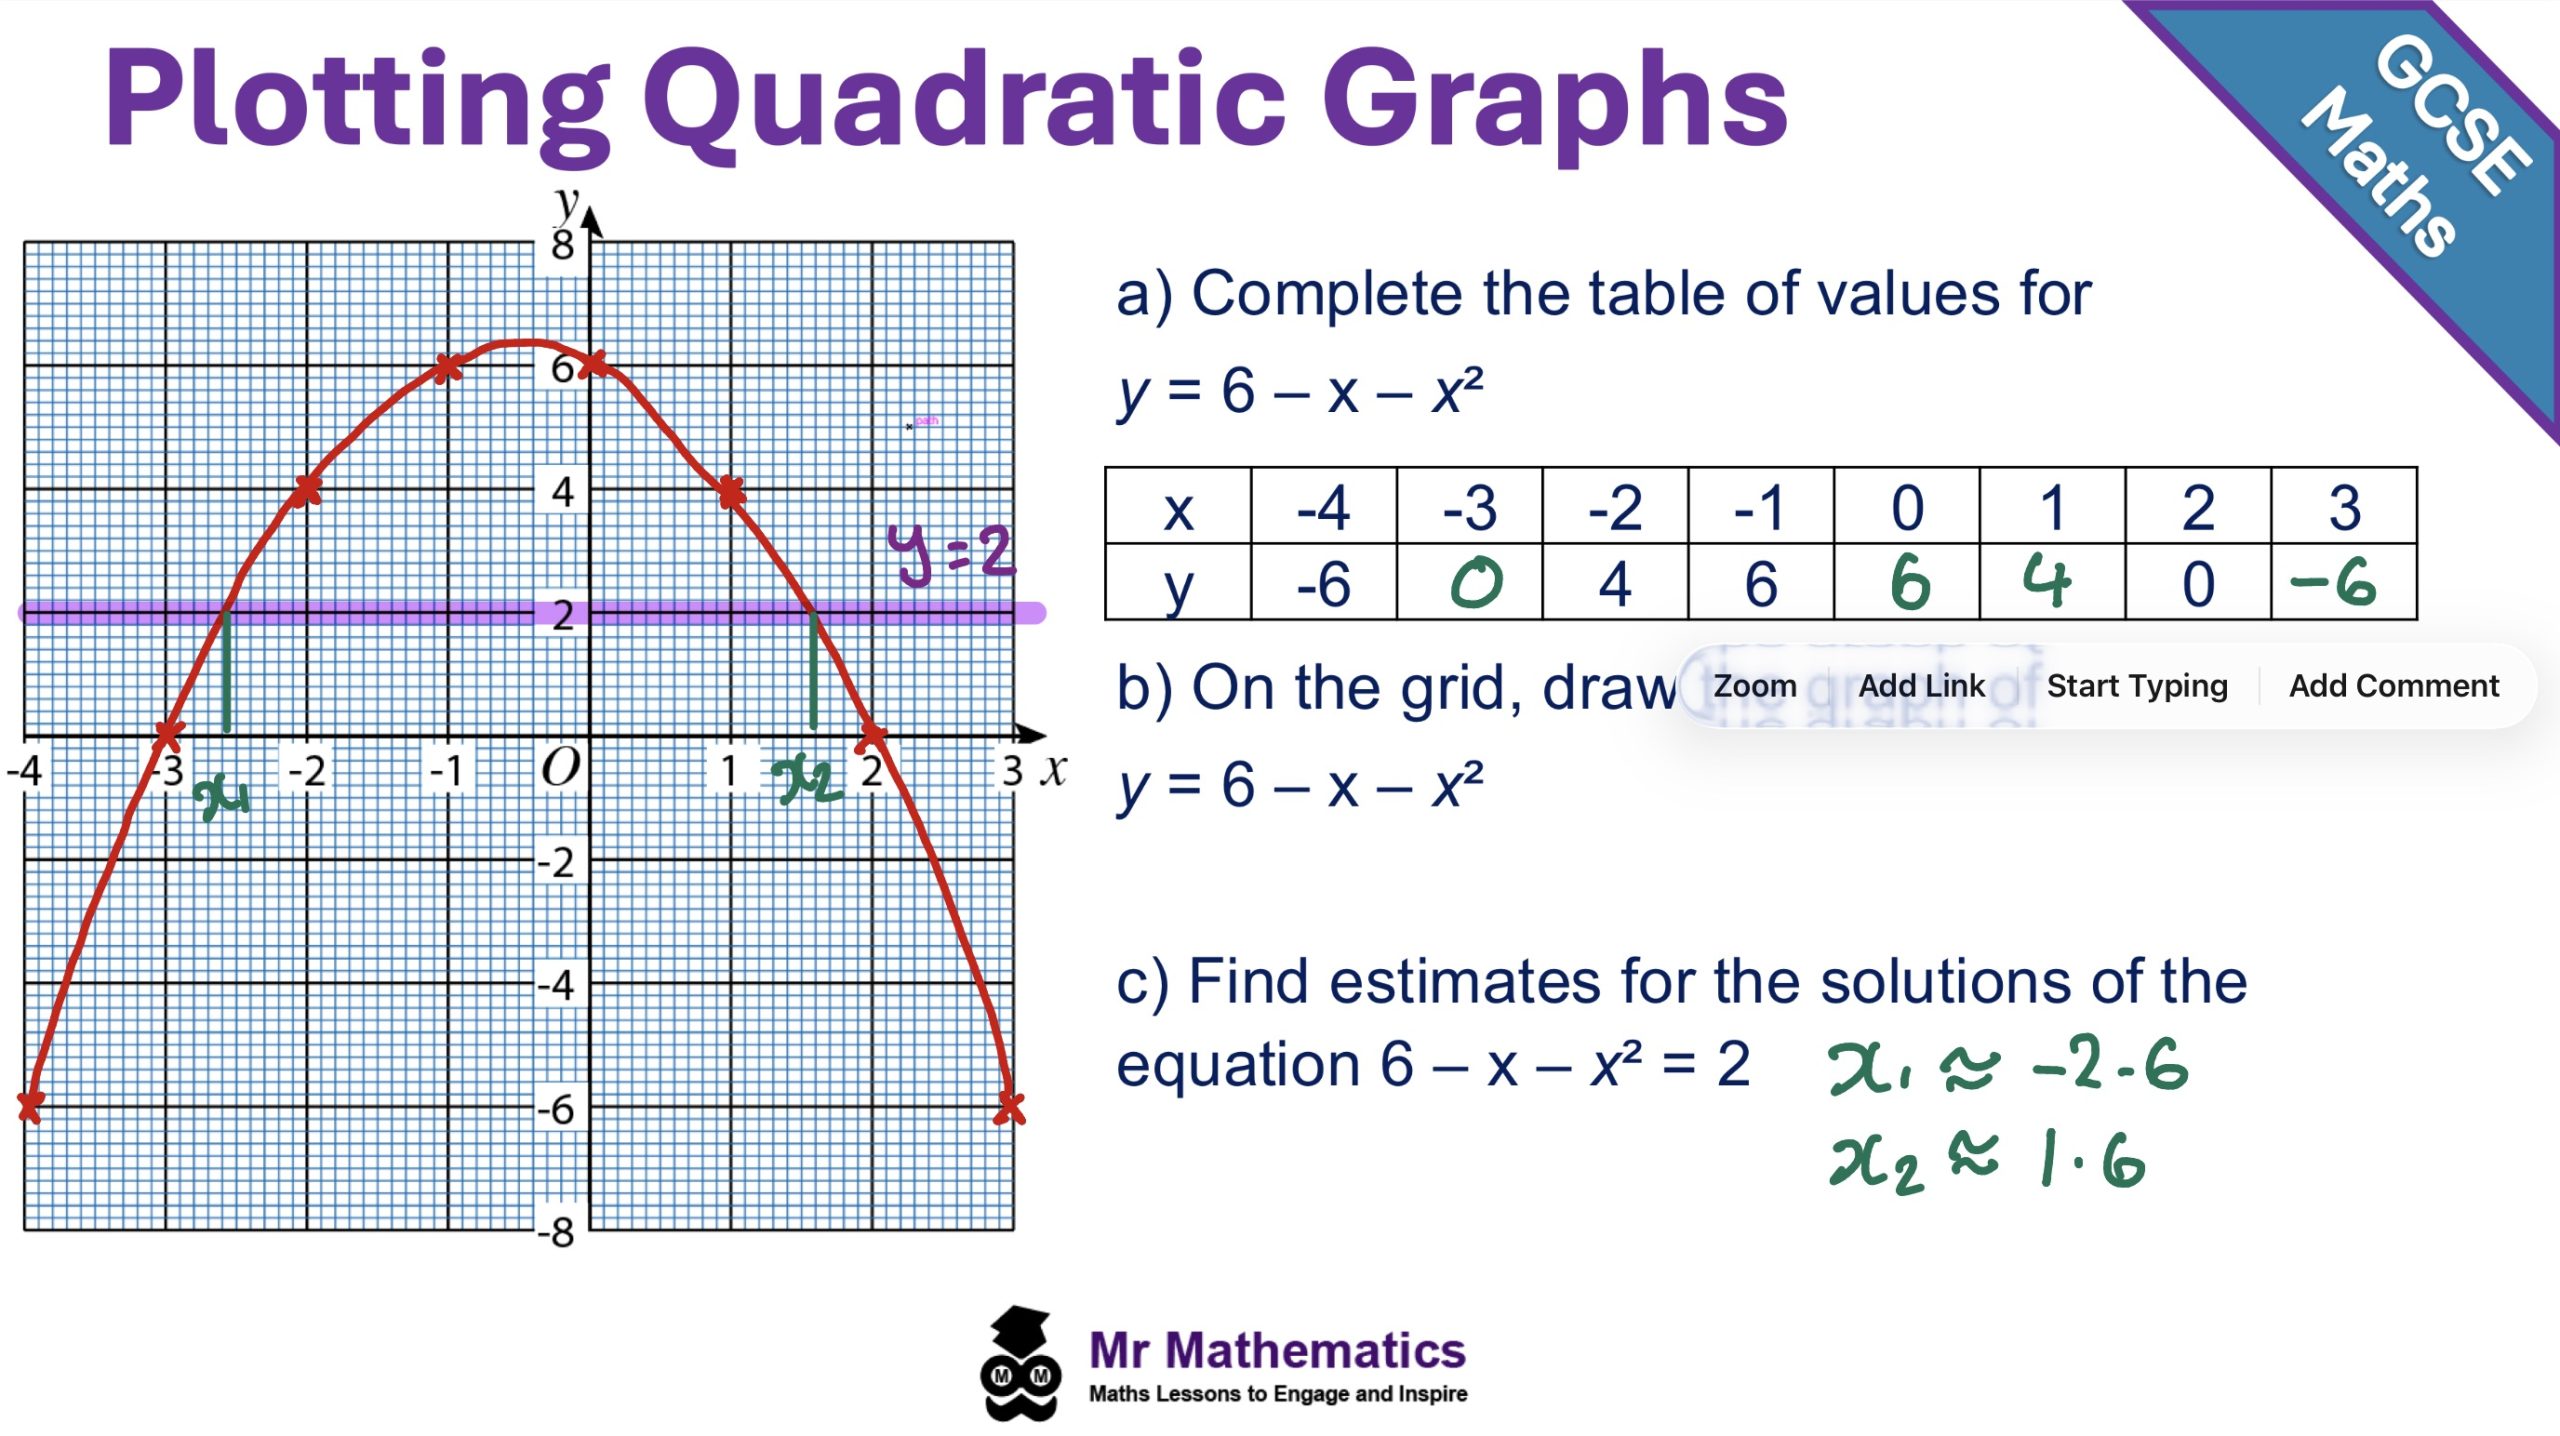
Q4: Solve by intersection
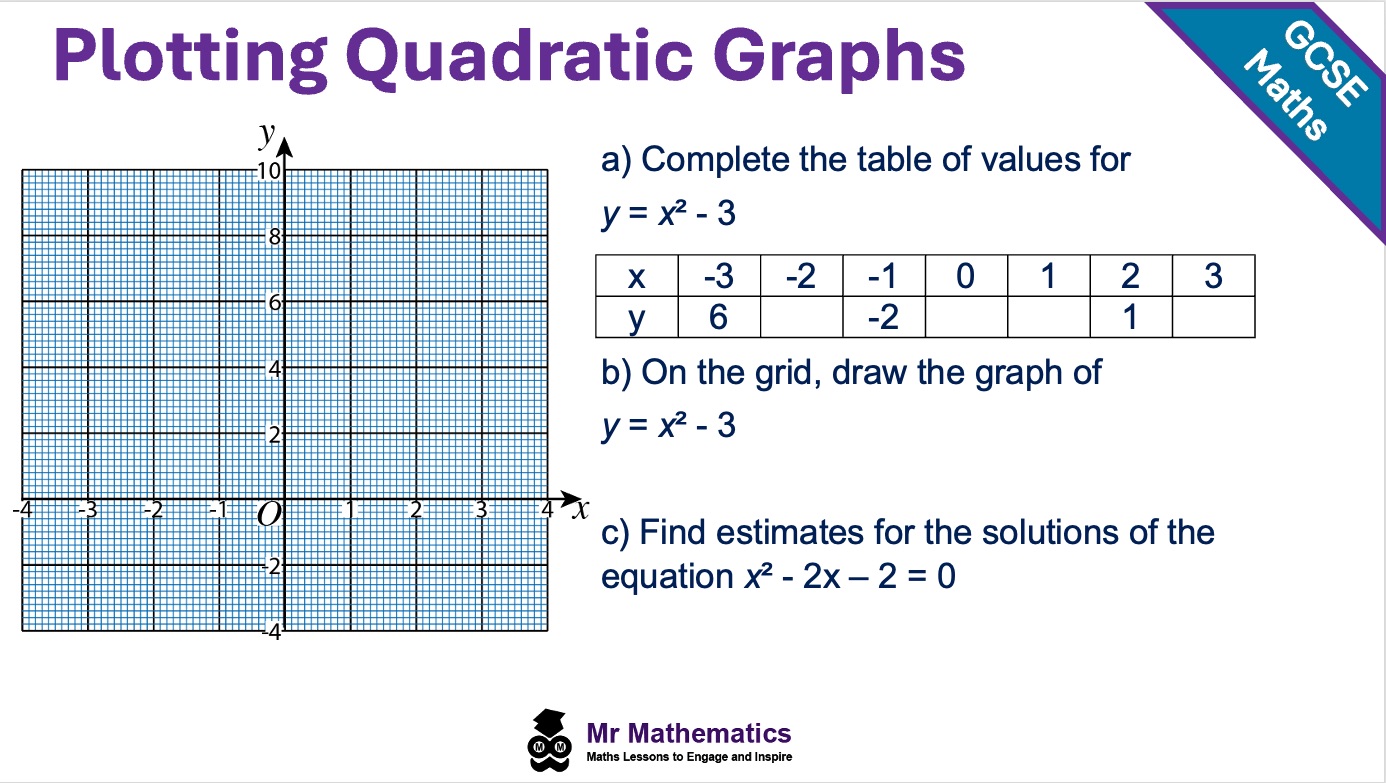
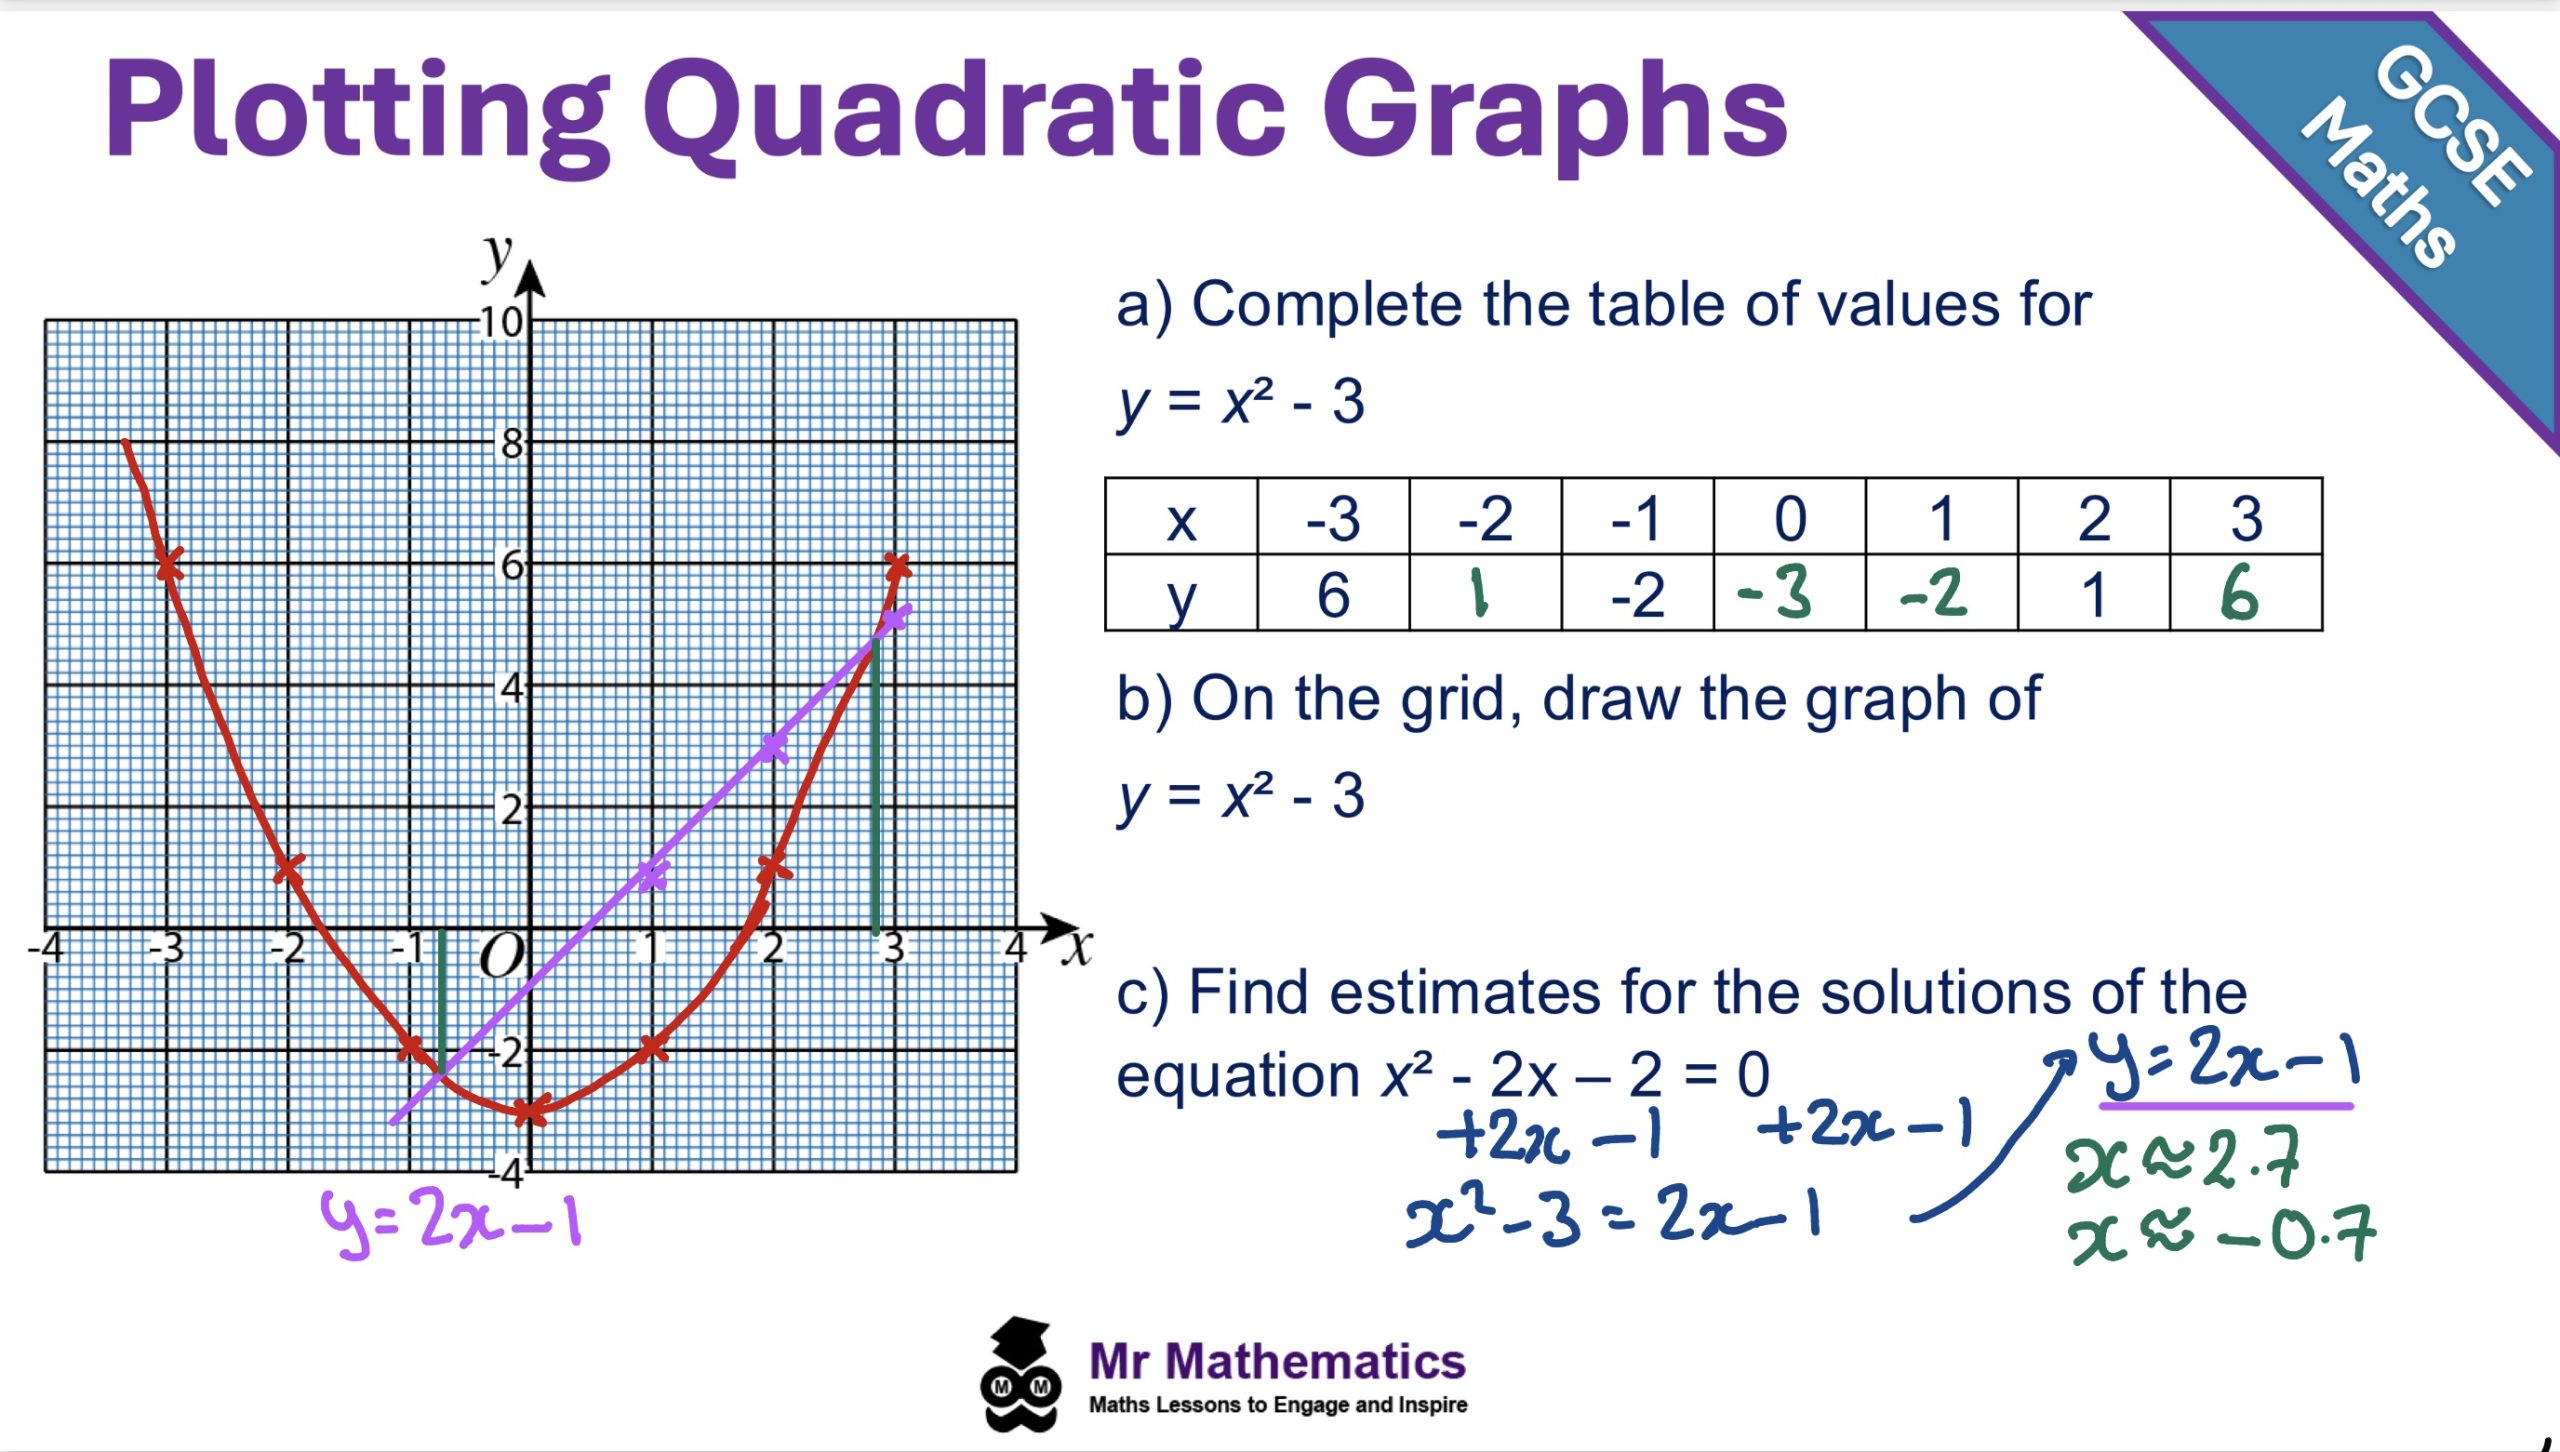
Mr Mathematics Membership includes ready-to-teach lessons, differentiated worksheets and exam-ready resources across KS3 and GCSE.
Planning for a whole department? Download the school membership flyer (PDF).
A quadratic graph is the graph of a quadratic function such as y = ax² + bx + c. Its shape is a parabola: a smooth curve with a single turning point.
Complete a table of values by substituting x into the equation, plot the coordinate pairs on Cartesian axes, then draw a smooth curve through every point. Do not join the points with straight line segments.
The table gives the coordinates you will plot. Without accurate y-values, the curve will be wrong even if your drawing looks neat. Show working for each substitution, especially when squaring negative numbers.
Squaring a negative incorrectly, for example calculating (−3)² as −9 instead of 9. Use brackets on a calculator, or work the square by hand. Other common errors include joining points with straight lines or missing a clear turning point.
Compare your finished graph with the properties of a parabola: one turning point, a smooth curve, and all plotted points on the curve. If the shape looks wrong, recheck the table and the plotted coordinates before redrawing.
To solve y = 0, read the x-values where the curve crosses the x-axis. To solve more generally, rearrange so one side is a quadratic and the other is a straight line, plot both, and read the x-coordinates of the intersection points.
If the coefficient of x² is negative, the parabola opens downwards and has a maximum turning point. The plotting method is the same: complete the table, plot the points, and draw a smooth curve.
Download the free printable worksheet from this page, or the separate exam questions PDF. Both include exam-style plotting questions with worked solutions in the accordions above. No membership is required.
Build a coherent graphical functions sequence with these related resources. For the full topic hub, visit All Graphical Functions Lessons.
A Mr Mathematics membership gives you 1000+ ready-to-teach lessons, differentiated worksheets and question generators for KS3 and GCSE.
Schools can also download the school membership flyer (PDF).
A research-backed case exploring why over-reliance on automated math homework platforms and repetitive worksheets lowers student expectations, and how departments can build genuine mathematical thinking.
How to teach converting between fractions, decimals and percentages.
Four problem solving lessons to develop student’s mathematical reasoning and communication skills.
